Increase migration throughput with multiple endpoints
One of the most common questions when migrating mailboxes to Exchange Online is:
“How can I speed up my migration?”
There are several ways to achieve this. And we’ll give you an overview of how to improve throughput with multiple migration endpoints.
Before you begin
Before setting up multiple migration endpoints, it’s important to familiarize yourself with Exchange Hybrid configuration. You can find guidance on how to create a hybrid setup here on Practical 365. While a couple of things have changed very recently, you’ll still follow the same basic tasks.
Migration endpoints
When you configure Exchange Hybrid, you publish at least one migration endpoint.
The Hybrid Configuration Wizard enables the MRS Proxy component on Exchange 2016 Mailbox servers. The name used for the Exchange URL is typically also used as the FQDN for the migration endpoint.
Consider the organization below, where we published our Exchange environment through a load balancer to the internet. We use mail.practical365.com as the unique external name used when moving mailboxes.
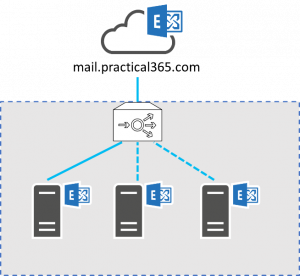
Figure 1: A single migration endpoint
In the example above, we have the external name in front of a load balancer (most likely behind a firewall as well). This single migration endpoint will be used for the migration. And it will distribute the traffic across the servers behind the load balancer.
For small organizations, a single Migration Endpoint may be sufficient. After all, the simplest setup is often the best one to use.
Introducing multiple migration endpoints
However, if you need to improve throughput then you will find that a single migration endpoint is not enough.
Typically, you’ll want to consider this solution if you’re part of a large organization with more than two or three servers. Or if you have Exchange servers in multiple data centers or regions. In such cases, you’ll see the benefits of being able to initiate multiple migration batches, each configured to use a separate named migration endpoint.
This works by configuring separate names for the endpoints relative to the EWS URL name. We will still use the Exchange Web Services external URL. It will remain published in the same way as in the example above. Instead, we will have a mapping between the endpoint names.
Each of these distinct names will need to be published and registered separately in the external DNS. We will also need to ensure that the name is contained in the SAN SSL certificate. Or use a wildcard certificate so that multiple names are supported.
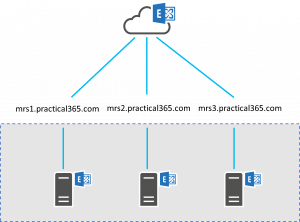
Figure 2: High Level View of Multiple Migration Endpoints
In the example above, you will see that we have configured three separate names: mrs1.practical365.com, mrs2.practical365.com, and mrs3.practical365.com.
SSL Certificate and Virtual Directories
In our example for practical365.com, this means that the SSL certificate used is likely to have the following names configured practical365.com :
- used for normal client access and, for Hybrid, used for federated sharing, including Free/Busy (availability).
- Used for Autodiscover, both for on-premises and Office 365 clients when in Hybrid, and for discovering URLs used by Hybrid, such as the Exchange Web Services URL to be used in federated sharing.
- mrs2.practical365.com and mrs3.practical365.com – used for migration endpoints.
One area we don’t need to reconfigure is the Exchange virtual directories. The Exchange virtual directories will remain as is and, in our example, will continue to use the name mail.practical365.com.
Instead, when creating endpoints, we manually specify their names. This means the configuration is relatively easy to set up. If you’re using the simple method for migration, you’ll switch to this approach without interrupting any ongoing migrations.
External publication
Publishing each migration endpoint, however, may require more thought. This is because you won’t simply be reusing the existing configuration of the externally published load balancer. Instead, we’ll be publishing each server individually. There are several ways to accomplish this.
Configure the firewall
The simplest option is to configure the firewall to directly publish each Exchange server. This is typically done with a NAT mapping for each Exchange server, with HTTPS (Port 443/TCP) open. This will allow traffic from the Exchange Online IP addresses.
In this case, the external firewall will be configured with a separate external IP address for each Exchange server. Naturally, each Exchange server used must have an SSL certificate. It must also have an updated list of Subject Alternative Names installed and assigned to IIS. Each migration endpoint name must be registered in the external DNS, mapped to the corresponding external IP address:
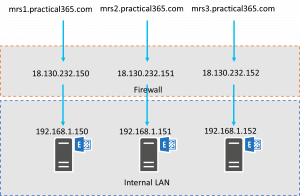
Figure 3: Direct Firewall Mapping
This approach may not be suitable for all organizations, especially if the network architecture does not support publishing servers located on the external network.
Load balancer
Using the existing load balancer with IP addresses for each migration endpoint name will be fine.
Using a load balancer for this purpose introduces another aspect that can affect performance. But it does offer a bit more flexibility. You can:
- to further restrict the published URL to only the MRS proxy path (/ews/mrsproxy.svc)
- to use the load balancer’s Layer 7 capabilities to use a single external IP
- to allow the backend server to be changed in the event of a single server failure.
The advantage of this approach is that it can be more effective in a multinational Exchange organization. In this context, publish endpoints in each region from which you need to migrate mailboxes. This will prevent mailboxes from traversing the WAN during migration.
Configure Exchange Online
You’ll be happy to know that within Office 365, the setup required to enable this is simple. You need to configure the migration endpoints. Then, you’ll choose which endpoint you want to use when creating new migration batches.
To do this, use PowerShell to connect to Exchange Online. Then create a new migration endpoint for each of the requirements:
$ExchangeCredentials=Get-CredentialNew-MigrationEndpoint -Name “Endpoint Name” -RemoteServer “Endpoint FQDN” -ExchangeRemoteMove -Credentials $ExchangeCredentialsIn our example organization, this would look like the commands below:
New-MigrationEndpoint -Name “mrs1.practical365.com” -RemoteServer “mrs1.practical365.com” -ExchangeRemoteMove -Credentials $ExchangeCredentials
New-MigrationEndpoint -Name “mrs2.practical365.com” -RemoteServer “mrs2.practical365.com” -ExchangeRemoteMove -Credentials $ExchangeCredentials

New-MigrationEndpoint -Name “mrs3.practical365.com” -RemoteServer “mrs3.practical365.com” -ExchangeRemoteMove -Credentials $ExchangeCredentials
Remember to plan your migration batches to ensure they are distributed across each migration endpoint; and in a multinational deployment, align mailboxes across each set of migration endpoints.