Deploying exe applications with Microsoft Endpoint Manager
Moving from ConfigMgr to Intune
Over the past few years, the trend toward managing users’ corporate devices has grown exponentially and continues to evolve alongside recent global changes in the way businesses are conducted. Many organizations have already abandoned or are beginning to abandon the associating of devices with on-premises Active Directory domain controllers. They are also abandoning the use of Group Policy and ConfigMgr (formerly known as SCCM). They are now moving toward modern management using Microsoft Endpoint Manager to ensure data protection and security in the cloud (and on-premises).
Countless organizations have relied on ConfigMgr for years as a product to manage just about everything endpoint-related, from creating device images to delivering applications to entire organizations. Now, these organizations face the daunting task of integrating dozens, if not hundreds, of applications into the new world of modern management.
So, what should we do when we switch to using Intune instead of ConfigMgr to deploy apps? While Intune offers Microsoft 365 Apps and Microsoft Edge out of the box, .MSI or .EXE apps need to be packaged differently.
This article focuses on packaging .exe applications and best practices you can implement to ensure effective management of these applications in the future.
Prerequisites
Here are the basic prerequisites for deploying apps through Intune:
- You must have at least the Application Manager role in Azure AD.
- A Windows 10 device that is enrolled in Intune via Azure AD Join or Hybrid Azure AD Join.
- A Microsoft 365 license or a bolt-on that includes Intune, such as Microsoft 365 E3 or E5, is required.
Step 1 – Preparing the Application
First you need to download the Microsoft Win32 Content Prep tool here .
Once downloaded, we will create 3 folders:
- \Application Name – A folder with the name of the application you are going to create; it doesn’t have to be exact, but it should be easily recognizable so you can remember it in the future. This is where the IntuneWinAppUtil.exe file will be located.
- \Application Name – This folder contains the essential components of the application. All application and configuration files will be moved or created here.
- \Application Name\Output – This folder contains the .IntuneWin file.
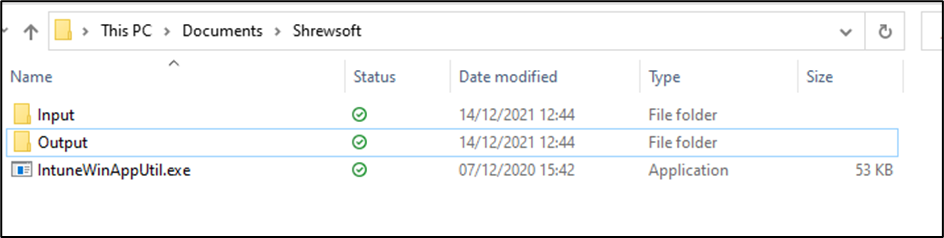
Once these folders are created, we need to move the .exe file into the Input folder. I’ll use an old VPN client called Shrew Soft as an example.
*Note: My main advice for packaging any app is to manually install it on your device first – this will allow you to see how the device installs in your environment.
You will also need to find and record the following information:
- Install Location – Where does the app install?
- Launching the application – What is the main executable of the application?
- Application File Version – What version of the application is installed? To find out, right-click the installed .exe file, go to Properties, and then Details.
- Installation Settings – Some applications have a reading guide or administrator’s guide, which can be very useful for silent installation, uninstallation options, or to understand if there are other options to customize an installation.
Step 2 – Creating the application
Once we have this information, we can create the application. To do this, we need to create two .CMD files, one for installing and one for uninstalling the application. I’ve provided the basis for both .CMD files below:
@ECHO OFF
SET SOURCE=%~dp0
SET SOURCE=%SOURCE:~0,-1%
Below is the command I used for Shrew Soft VPN:
@ECHO OFF
SET SOURCE=%~dp0SET SOURCE=%SOURCE:~0,-1%
vpn-client-2.2.2-release.exe /S /standard
The /S and /standard are specific to this application, but they ensure that the application will install silently and without user interaction.
For the uninstallation file, I created the same one but with the uninstallation commands. I named the files “Install-Shrewsoft-London.CMD” and “Uninstall-Shrewsoft-London.CMD” respectively.
Once we’ve completed the previous steps, we load PowerShell, change the directory to the folder created in step 1, and then run the IntuneWinAppUtil.exe file. You’ll then need to manually enter the following details:
- Source Folder – The input folder we created earlier.
- Installation File – The installation file we created earlier.
- Output Folder – The folder we created earlier for the IntuneWin file.
In PowerShell, you need to choose a catalog folder, press N and then Enter:

After pressing the Enter key, the .Intunewin application is created. The PowerShell output should look like this:

The application we just created will now be visible in the output file we created earlier:

Step 3 – Publish the application in MEM (Microsoft Endpoint Manager)
Now that the app is packaged, we need to publish it. So, go to Microsoft Endpoint Manager, click Apps on the left side, go to Windows, and then press Add. The application type will be Windows App (Win32). We can now install the app in eight easy steps!
Step 1 – Application Information
This is where we specify the application we created earlier:

We then need to provide some additional information; the following details are required:
- Name – The name of the file.
- Description – A valid description that is displayed to both administrators and users.
- Publisher – The name of the company distributing the app. This name will be visible in the company portal.
Step 2 – Program
We are now presented with two mandatory options; I usually leave the rest as default:
- Installation Command: Enter here the name of the installation file that we created and integrated into the .IntuneWin file.
- Uninstall Command – Enter here the name of the uninstall file that we created and integrated into the .IntuneWin file.
Step 3 – Requirements
At this point, we need to enter the operating system and hardware requirements that devices must meet before installing the app. Below are the two requirements:
- Operating System Architecture – Select 32 or 64 bit, or both.
- Minimum Operating System – Select the minimum level of Windows 10 operating system, i.e. Windows 10 21H1.
You can also set requirements such as required disk space, required physical memory, minimum number of logical processors, and minimum processor speed. It is a good idea to set these parameters if you have a resource-intensive application with a high number of minimum requirements.
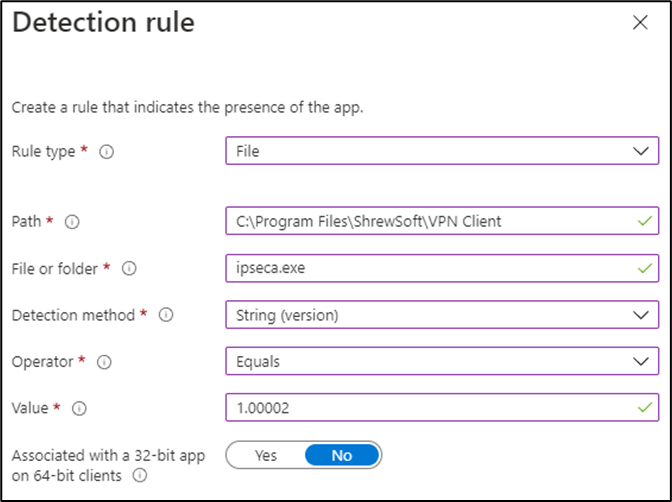
Step 4 – Detection Rules
This step will let MEM know that the application is present and working. Remember at the beginning of the article, I told you to note the installation location, executable name, and version? This is where we need them!
Under Rules Format, go to Manually Configure Detection Rules. Fill in the information you gathered earlier:
Step 5 – Dependencies
If the application you are creating depends on another application, this ensures that the other application will install itself first. I have found this particularly useful in the past for simple tasks such as installing a network printer – I was able to install the drivers in the system context, then create another application to push the network driver to the user in the user context.
It’s worth noting that there is a maximum of 100 dependencies, which includes the dependencies of all included dependencies, as well as the application itself. If your application has no dependencies, you can proceed to the next step without having to configure anything.
Step 6 – Replacement
Replace is currently a preview option, and it allows you to directly replace another app with the app we just created. There is a maximum of 10 apps that can be updated or replaced, and three different scenarios in which you can use replace:
- If the replaced app exists on the device and the Uninstall previous version option is set to Yes. The replaced app will be uninstalled and the replacement app will be installed.
- If the app to be replaced exists on the device and the Uninstall previous version option is set to No. The replacing app will install on the device, the app to be replaced will uninstall according to the replacing app’s installer.
- If the app to be replaced does not exist on the device, only the replacement app will be installed.
Again, if this application deployment does not meet the three scenarios mentioned above, skip the additional configuration needed in this step and proceed to the last step, assignments.
Step 7 – Assignments
The final step is to target the apps to the devices you want to deploy them to. This can be done by group, by all users, or by all devices. However, we recommend deploying apps in groups to test and manage the deployment.
First, we want to make sure the device is Required or Available for enrolled devices. This will confirm that the application is available for enrolled devices in the Company Portal application. Once users are assigned, the process is complete after reviewing the configuration; the application then deploys to the devices specified in step 7.
Conclusion
After successfully completing the above steps, you now have:
- Creating an .Intunewin application ready to be imported into Intune.
- Created an app in Intune with all necessary configurations, including a detection rule and all dependencies.
- Deployed the application to a group of users to begin testing.
Keep in mind that every application is different, which means that creating the IntuneWin application in Step 1 will involve different switching settings than the examples shown in this article. And as we mentioned at the beginning of this article, installing the application locally and understanding the installation process should be your main takeaway from this article.