Improve your productivity with these practical tips
Most businesses and individuals who create and collaborate online using documents are familiar with Microsoft Office. But many are still unaware of the many time-saving features built into this powerful office suite.
In this article, we’ll look at 18 time-saving tips to help you get the most out of your Microsoft Office suite. Your documents, spreadsheets, and presentations will look great, and you’ll complete them in half the time.
Used correctly, these hidden features can significantly increase employee productivity. They help you save time and money, and provide a more enjoyable work experience.
How to Get the Most Out of Microsoft Office: Preparation
New features are constantly being added to Microsoft Office, so make sure you have the latest version. If you have a Microsoft 365 subscription, you can update your apps from Microsoft Autoupdate. Or, set up automatic updates. Alternatively, if you purchased a standalone version of Microsoft Office, you may need to update to access some of the features listed below.
Tip #1: Automatically save changes with OneDrive
OneDrive is Microsoft Office’s cloud storage service. It’s available whether or not you have a Microsoft 365 subscription. OneDrive already lets you access all your files anywhere, anytime. But you can also connect it to your Microsoft Office software to take advantage of the autosave feature.
When enabled, changes are updated in the cloud in real time. Additionally, OneDrive stores multiple versions of your documents, so you can revert to an earlier version. Loss of time caused by a computer glitch or power outage makes this feature vital. To find previous versions in Microsoft 365, click File > Info > Version History.
Tip #2: Learn the suite shortcuts
One of the biggest advantages of Microsoft Office is the consistency of the user experience across different applications. This means that most keyboard shortcuts work the same way in Word, Excel, and PowerPoint. Learning these commands can significantly speed up productivity.
- Ctrl + S (⌘S) to save,
- Ctrl + P (⌘P) to print, and even more obscure commands like
- Ctrl + D (⌘D) for font dialog.
A great productivity tip is to provide employees with a list of common shortcuts. They can refer to them as needed until they become second nature.
Tip #3: Use the “Tell Me” feature (Word)
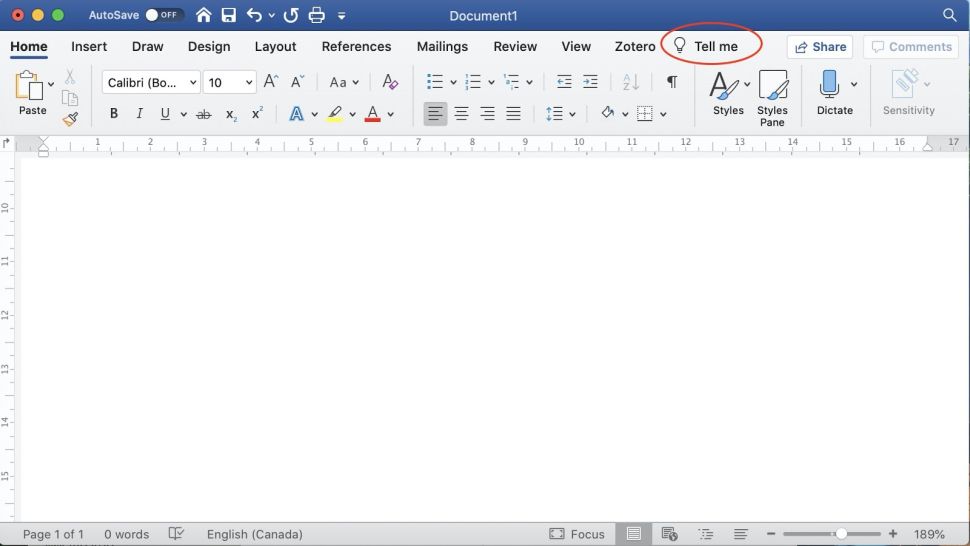
The Tell Me feature was added to Microsoft Office 2016, but once you get it, it’s a godsend. Want to change the style? Type “Style.” Crop a photo? Type “Crop.”
- Insert a table,
- add a comment,
- change the layout,
- update the design,
- read the text aloud
Nearly all Office features are quickly and easily accessible through this menu, while smart suggestions make it easy to find what you’re looking for by typing just a word or two.
However, Microsoft 365 is constantly updating its feature set. Some features may not be present in the latest versions.
Tip #4: Quickly share documents with the Share button
The Share button is located in the top right corner of the app. It can be used to quickly share a document via OneDrive, email, AirDrop (Mac only), and other third-party services. Instead of opening your email client, searching for a file (“Where did I save this file again?”), simply click the Share button, and select your recipients.
Tip #5: Search and Replace
If you need to change a single word or group of words throughout an entire document, you can do so quickly with the Find & Replace feature. Simply press Ctrl + Shift + H (⌘⇧H) to bring up the Find and Replace dialog box. Type the text you want to change in the Find box, the replacement in the Replace box, and press the Replace button. Office will search the document and make the necessary changes.
You can also replace with nothing (leaving the Replace field blank) to remove multiple occurrences of a word.
Tip #6: Advanced Search and Replace
This powerful tool is more than just a tool. By clicking the button in the lower left corner of the dialog box, you can access advanced features to instantly change the font style, paragraph settings, and more of any text.
For example, you can find all bold text and make the font red, or select all text in a specific language and make it italic. Use this feature whenever you need to make significant changes to specific text styles.
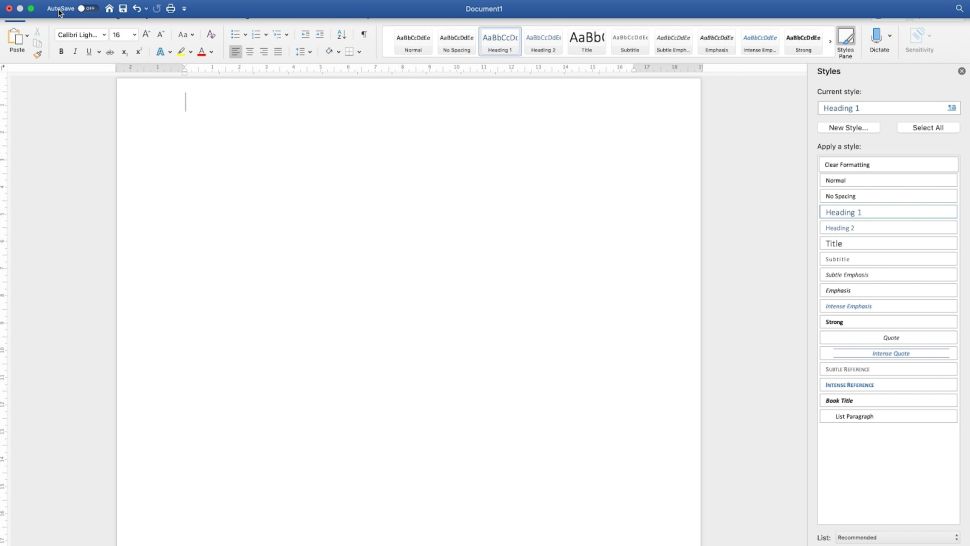
Tip #7: Edit and use styles to achieve high-quality documents.
It’s surprising how many people who use Microsoft Office every day still don’t take advantage of styles to streamline their documents and speed up writing. Styles are located under the Home tab and allow you to apply preset font settings on the fly. You can also edit these styles to suit your needs and your document. Styles automatically update when you change themes, allowing you to change the appearance of an entire document in a snap.
Tip #8: Copy and paste multiple items with Spike
This handy feature lets you copy and paste multiple items at once. Simply select the first block of text, press Ctrl + F3 or ⌘F3, and then move on to the next. Each time you press Ctrl or Command + F3, the text will be saved, and so on. When you’re ready to paste everything, type Ctrl + Shift + F3 or ⌘⇧F3. You can also type “spike” (in lowercase) and press Enter, and the saved text will be saved for future use.
Tip #9: Copy and paste formatting
Quickly streamline formatting on blocks of text by pressing Ctrl + Shift + C (⌘⇧C) to copy formatting (font and paragraph style, colors, alignment, etc.), and Ctrl + Shift + V (⌘⇧V) to paste formatting onto selected text.
Tip #10: Customize your Office ribbons
If you frequently look for certain functions in menus or developers, feel free to add them to your ribbon. You can do this under Preferences > Ribbon & Toolbar, or by going to File > Options > Customize Ribbon. You might be surprised by the huge range of functions you can add to your ribbon for quick access. You can also hide the ribbon to have more space by clicking once on the open tab, going to View > Ribbon, or by typing Ctrl+F1 (⌥⇧R).
Tip #11: Triple-click to select a paragraph
Most people know that you can double-click a word to select it. You can also triple-click a word to select the entire paragraph. This is very useful for moving large chunks of text while editing.
Tip #12: Adjust the autocorrect to suit you
Microsoft Office often changes the text you type, even if you’re happy with it. You can adjust these settings under Tools > AutoCorrect Options. You can also delete words that bother you or add words you frequently mistype. You can even add symbols, such as replacing (c) with ©.
Tip #13: Compare documents side by side (Windows only)
Of course, you can simply open separate windows and place them side by side. But Microsoft Office’s Side by Side feature takes things a step further with synchronized scrolling. This saves a lot of time when comparing and editing versions of long documents.
Tip #14: View two different parts of the same document with Split View
This is a fantastic tool when editing one part of a document while referencing another section. When writing an introduction or conclusion, for example. Simply go to the View ribbon and select Split View. You can scroll through the different sections in each window independently. But you can also make changes in either of them.
Tip #15: Copy and Paste Like a Pro
Everyone knows how to copy and paste a block of text. But did you know you can quickly paste text without formatting, or as an image or PDF directly into your document? Simply type Ctrl + Alt + V (⌘⌃V) and a dialog of options will appear.
In Word, you can use this dialog to paste text without formatting, while in Excel you can paste just values, formatting, or comments, everything except borders, and even add, subtract, multiply, and divide sums on the fly.
Tip #16: Customize your shortcut menu
You can add frequently used functions to the Quick Access Toolbar. You can do this in any application’s shortcut menu, at the very top of the document. By default, you’ll see commands like Save, Print, and Cancel, but you can add almost anything here. Just click the arrow on the right to add the commands you need.

Tip #17: Merge Shapes (Powerpoint)
You can combine simple shapes to create more complex ones. They’ll look great in your presentations, and you don’t need a sophisticated tool like Illustrator to do it. Simply select the shapes you want to merge and click Merge Shapes on the Format tab. These merged shapes can be copied and pasted into other applications, such as Word.
Tip #18: Use Conditional Formatting to Dynamically Format Cells (Excel)
Conditional formatting allows you to apply styles to cells based on their values, for example. For example, you might want all positive values to be green and all negative values to be red. Simply select the desired cells and then use the Conditional Formatting tab on the Home ribbon. There are many presets, but you can also define your own rules and equations.
Conclusion
Microsoft Office is one of the best office suites available, with tons of powerful options. This helps streamline your employees’ work and boost productivity. Encourage your employees to explore the software and actively share tips and tricks with each other. Not only is it fun and exciting to discover new features, but it also makes collaboration much easier. This allows employees to get more done in less time, while working more comfortably.