Migrate from Google Workspace to Microsoft 365
The migration process takes several steps and can take from several hours to a few days depending on the amount of data you are migrating.
Prerequisites
Before you start the Google Workspace migration:
- Make sure you’re signed in to Google Workspace as a project creator.
- You have completed the following procedures:
- Create a subdomain for mail routing to Microsoft 365 or Office 365
- Create a subdomain for mail routing to your Google Workspace domain
- Provisioning Microsoft 365 or Office 365 users
If you’d like to know more, check out the Prerequisites page .
Google Workspace Manual Migration Process
The Google Workspace manual migration process involves the following steps:
- Create a Google service account
- Enable API usage in your project
- Grant service account access for your Google client
- Start a Google Workspace migration batch with the classic Exchange Admin Center (Classic Admin Center)
Create a Google service account
- Using a Chrome browser, sign in to your Google Workspace admin console admin.google.com .
- In a new tab or window, navigate to the Service Accounts page .
- Select Create Project, name the project, and choose Create.
- Select + Create a service account, enter a name, choose Create, and then choose Done .
- Open the Actions menu , select Edit , and note the unique ID. You will need this ID later in the process.
- Open the Show domain-wide delegation section .
- Select Enable G Suite domain-wide delegation , enter a product name for the consent screen, and then select Save. Notes: The product name is not used by the migration process, but is required to save it in the dialog box.
- Open the Actions menu again and select Create Key.
- Choose JSON, then Create . The private key is saved in your device’s download folder.
- Select Close .
Enable API usage in your project
If all required APIs have not yet been enabled in your project, you must enable them.
- Go to the Developer page for API Library and sign in as the Google user you used above in Create a Google Service Account .
- Select the project you used above.
- Search for the following APIs. Each of them must be enabled. Select Enable to enable them for your project:
- Gmail
- Google Calendar
- Contacts
Grant service account access for your Google client
1 – Go to the Google Workspace Admin page and sign in as Google Workspace admin for your tenant.
2 – Click Security, then API Controls, then Manage Domain-Wide Delegation.
3 – Below the list of API clients, click Add New.
4 – In Client ID, type the ClientId of the service account you created in the Create a Google Service Account section above.
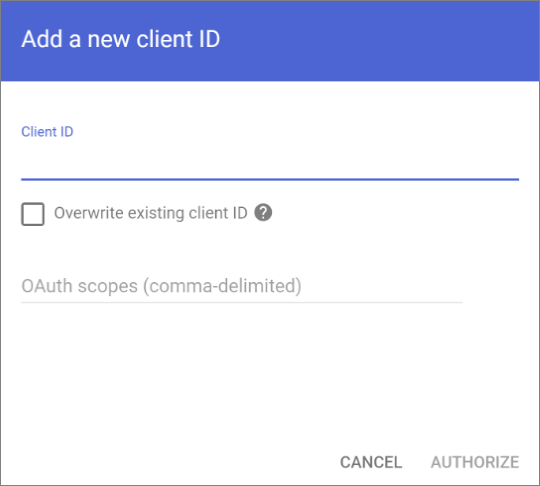
5 – In OAuth scopes, add the required scopes in comma-separated format, with no spaces in between. For example:
- https://mail.google.com/,
- https://www.googleapis.com/auth/calendar,
- https://www.google.com/m8/feeds/,
- https://www.googleapis.com/auth/gmail.settings.sharing,
- https://www.googleapis.com/auth/contacts
If the OAuth scopes are entered incorrectly, the resulting list will not match and the migration process will fail later, after the migration batch has started.
6 – Click Allow . Verify that the resulting list displays the four (4) expected OAuth scopes. Important: It may take between 15 and 24 hours for these settings to propagate.
Start a Google Workspace migration batch with the classic Exchange Admin Center
1 – In the Exchange admin center, click Recipients, then Migration.
2 – Click “New +” to create a migration batch, then click Migrate to Exchange Online .
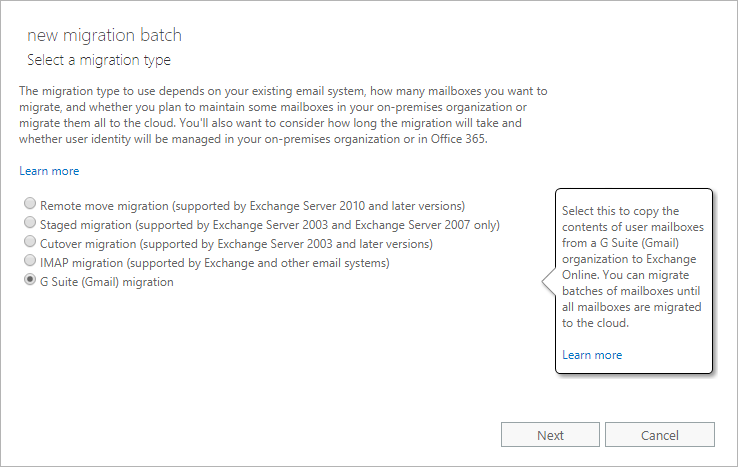
3 – In the New Migration Batch window, select G Suite Migration, then click Next :
4 – Create a CSV file containing all the users you want to migrate. You will need its file name below. Allowed headers are:
- EmailAddress (required). Contains the primary email address for an existing Microsoft 365 or Office 365 mailbox.
- Username (optional). Contains the primary Gmail email address, if different from EmailAddress.
5 – Under Select Users, click Choose File and browse to the CSV file of all the users you are migrating in this batch.
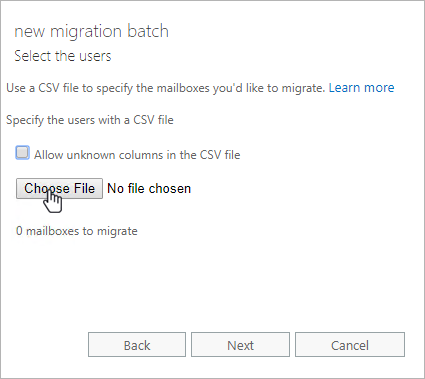
6 – After selecting the CSV file, click Open. Back on the New Migration Batch page, click Next.
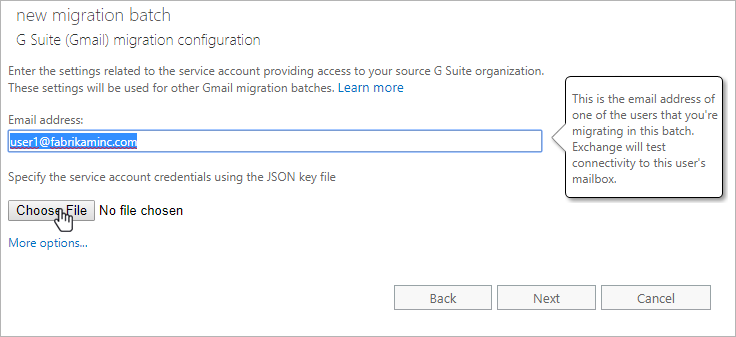
7 – Enter the super administrator email address in the Google Workspace environment. This is the Google Workspace administrator email address. This email address will be used to test connectivity between Google Workspace and Microsoft 365.
8 – Under “Specify service account credentials using JSON key file,” click Choose File, and then select the JSON file that was automatically downloaded when the service account was created. Click Open to select the file, and then, on the New Migration Batch page, click Next.
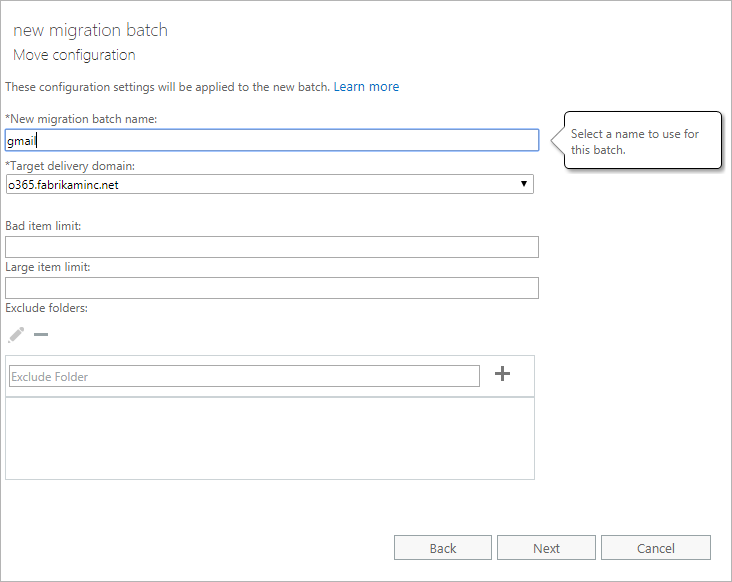
9 – In the next two fields, name your migration batch and enter the target delivery domain (Microsoft 365). You can also exclude folders from the migration. When you are finished, click
Next .
10 – Determine how you want to start and finish the migration batch.
Conclusion
To learn more about:
- Completing the migration batch, see Completing the migration batch in Classic AC.
- How migration happens in the backend, see Process Overview .