Understanding the concept of DNS
The acronym DNS, meaning Domain Name System , is a set of elements allowing a domain name to be matched with an IP address.
For example, when you want to access the site mydomain.ovh , the DNS set will direct your request to the IP address of the server hosting the site mydomain.ovh .
It is important to differentiate between DNS servers and the DNS zone . The DNS zone is configured at the DNS server level.
You can find information relating to DNS servers and how to modify them in our guide “ Modifying the DNS servers of an OVHcloud domain name ”.
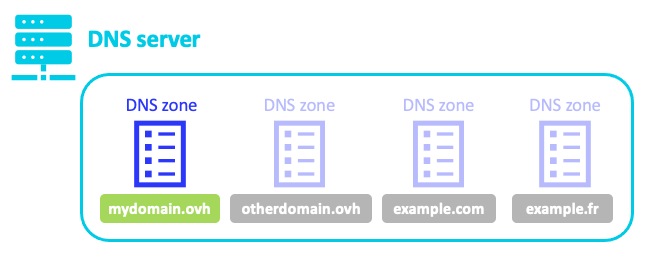
If we take the example above, when you type mydomain.ovh , you query the DNS servers for this domain name. These servers contain the DNS zone of the domain name mydomain.ovh where the IP address of the hosting of mydomain.ovh is entered . This allows your browser to display the website mydomain.ovh. This is called a DNS resolution.

The DNS zone
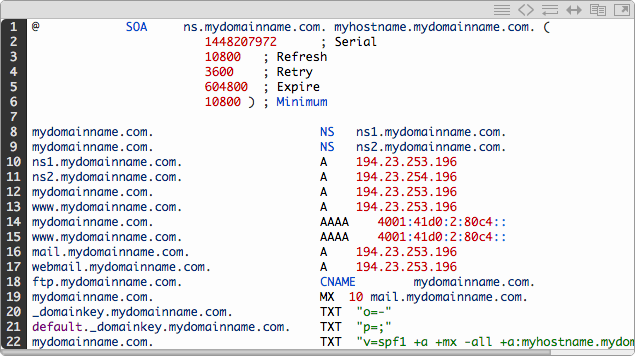
A domain name’s DNS zone is a configuration file containing records . These records are used to link your domain name to the servers that host your internet services, such as websites (via the A record) or email addresses (MX record).
Prerequisites
- Have access to manage the domain name concerned from your OVHcloud customer area .
- Be connected to your OVHcloud customer area .
- Use the OVHcloud configuration (its DNS servers) for the domain name in question.
- If your domain name does not use OVHcloud’s DNS servers, you must make the change from the interface of the service provider managing the configuration of your domain name.
- If your domain name is with OVHcloud, you can check whether they are using our configuration. To do this, go to your OVHcloud customer area , in the tab
Serveurs DNSfor the domain name in question.
In both cases above, be careful when making DNS server changes. The old configuration that could have been applied to your domain name will no longer be active if you have not previously reconfigured and customized the new DNS zone present at OVHcloud.
You can only have one active DNS zone at a time per domain name.
In practice
Access the management of an OVHcloud DNS zone
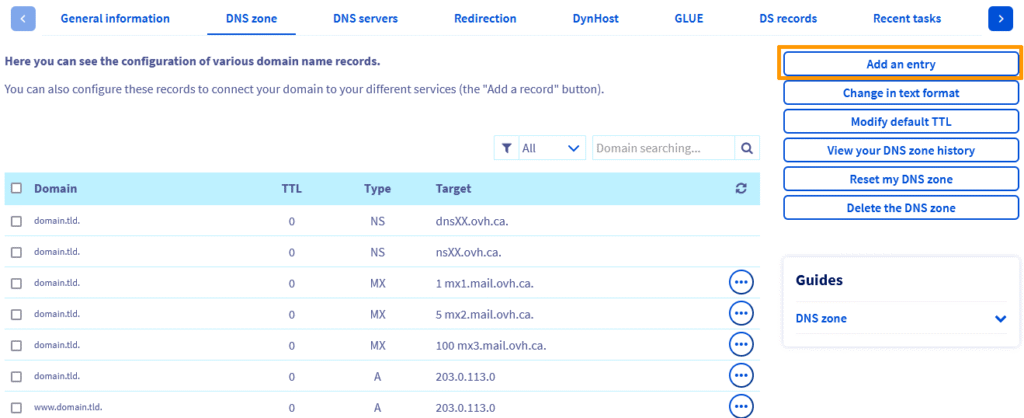
Log in to your OVHcloud customer area in the section Web Cloud. Click on Noms de domaine, then choose the domain name concerned. Finally, go to the tab Zone DNS.
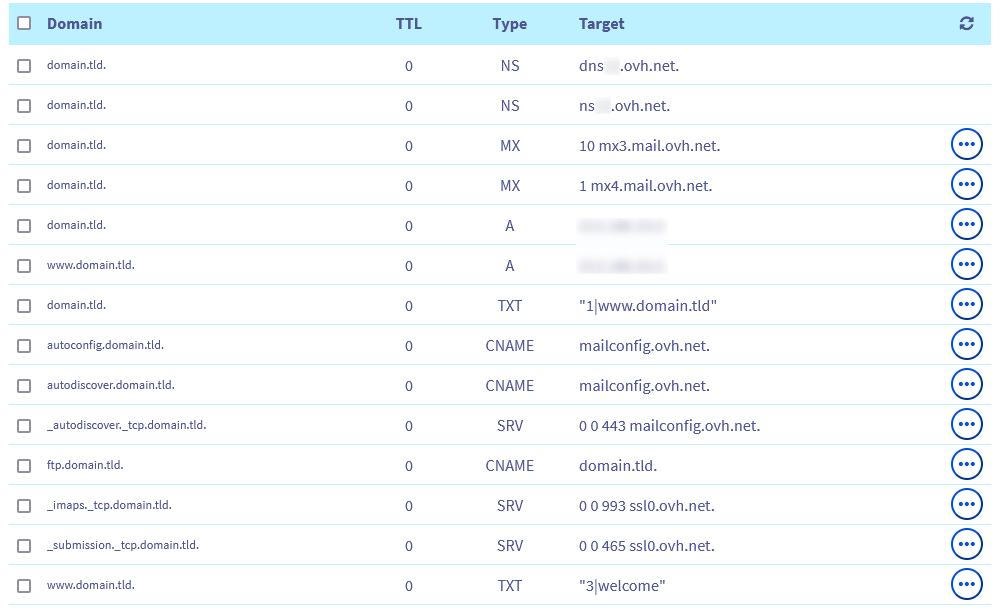
The table that appears displays a DNS record for each row associated with your domain name at OVHCloud. You can filter the contents by record type or by domain.
DNS records
Editing a DNS zone is a sensitive process : making an inappropriate change could, for example, make it impossible to access your website or receive new messages at your email addresses.
Understanding these different records will help you better understand the changes you’ll make if you edit your domain name’s DNS zone. We strongly encourage you to review the list below, which outlines the objectives and specifics of each record.
Timekeeping records
- A ( Address ): Connects a domain name to an IPv4 address
X.X.X.X(where theXare numbers between0and255). For example, the IPv4 address of your website server. - AAAA (4 A’s because this record is encoded on four times as many bits as the historical A pointer field ): Connects a domain name to an IPv6 address. For example, the IPv6 address of your website server.
- CNAME ( Canonical Name ): Uses the IP address of another domain name by creating a link called an alias. For example, if www.mydomain.ovh is an alias of mydomain.ovh , this indicates that www.mydomain.ovh will use the IP address of mydomain.ovh .
A TXT record using the same domain or subdomain as a CNAME record will disrupt the CNAME record’s functionality. Your CNAME record will then only work partially or not at all.
By convention, CNAME fields cannot be directly used by a domain in its own DNS zone. Indeed, the domain alone must directly point to an IP address with an A field (or AAAA if it is IPv6).
- NS field ( Name Server ): Defines the DNS servers associated with your DNS zone. For example, if the NS records in your DNS zone display the servers dns19.ovh.net and ns19.ovh.net , then you will need to use these in the tab of your OVHcloud Control Panel. See our documentation ” Modifying the DNS servers of an OVHcloud domain name ” for more information.
Serveurs DNS
Email records
- MX ( Mail e X changer): Links a domain name to an email server. For example, the address 10 mx1.mail.ovh.net corresponds to one of the OVHcloud email servers when you have an OVHcloud email offer. It is likely that your email provider has several email servers: several MX fields must therefore be created. Consult our documentation ” Adding an MX field to your domain name configuration “.
- SPF ( Sender Policy Framework ): Helps prevent potential identity theft on email addresses using your domain name ( spoofing ). For example, the record indicates that only sending servers linked to your OVHCloud email offer can be considered legitimate by the receiving server. You can enter this record as a TXT field or via our automatic configuration system. See our documentation ” Adding an SPF field to your domain name configuration ” to learn more.
v=spf1 include:mx.ovh.com ~all - DKIM ( Domain Keys I dentified Mail ): Allows you to verify the authenticity of the sender ‘s domain name and ensure the integrity of the email sent. The DKIM record is presented in the form of a key composed of several characters . The DKIM key is provided by your email provider (if this feature is offered by the latter), it is possible to enter it in the form of a TXT field.
- DMARC ( Domain – based Message Authentication , Reporting and Conformance ): Contributes to email authentication in conjunction with SPF and/or DKIM. This value will be provided by your email provider (if this feature is offered by the latter), and will at least be associated with an SPF or DKIM record.
Edit the OVHcloud DNS zone of your domain name
You can edit the OVHcloud DNS zone for your domain name by adding, modifying, or deleting a DNS record. There are two ways to do this:
Manually edit the area in text mode
For advanced users only. Also, be very careful with syntax when editing.
From the tab Zone DNS, click on Modifier en mode textuel then follow the steps that appear.
Use our setup wizards
From this point on, this documentation will only cover configuration via our wizards.
Have the information you need to modify in your OVHcloud DNS zone ready. If you are making this change at the request of a service provider, they must provide you with a list of the items to be modified.
Add a new DNS record
Zone DNS To add a new DNS record, from your domain name tab , click the button Ajouter une entrée to the right of the table. Select the DNS field type and follow the steps.
We encourage you to first check that this record does not already exist and does not point to a different target. To do this, filter the table contents by record type or domain. If the record already exists, we encourage you to modify it using the procedure described below.
When your record’s target is a URL, remember to punctuate it. If you don’t, your domain name will automatically be added to the end of your target.
Example: You want to create a CNAME record from test.mydomain.ovh to mydomain.ovh .
You must then have as target mydomain.ovh. and not mydomain.ovh without the . at the end.
Modify an existing DNS record
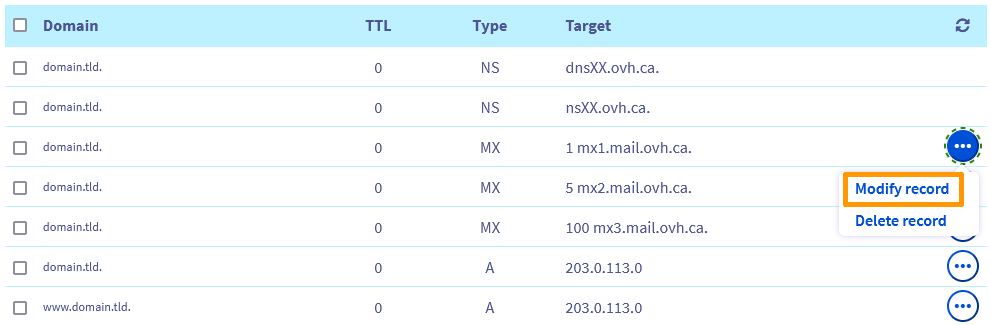
To edit a DNS record, still from the tab Zone DNS in your customer area, click on the icon ... in the table to the right of the selected entry. Then click Modifier l'entrée and follow the steps that appear.
Delete a DNS record
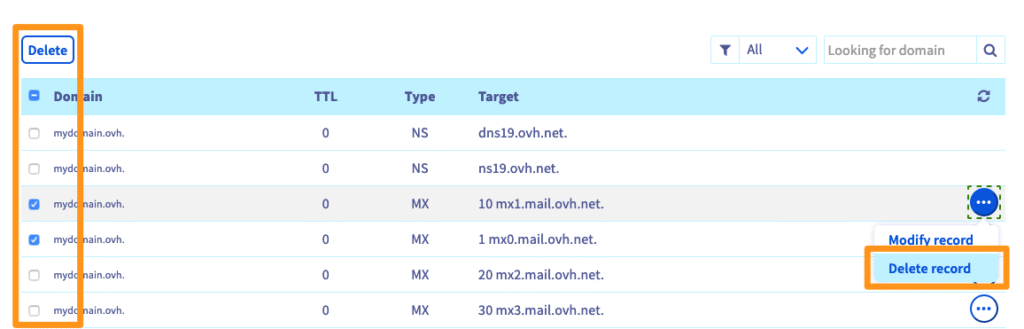
To delete a DNS record, still from your customer area tab Zone DNS , click the icon ... in the table to the right of the selected entry. Then click Supprimer l'entrée and follow the steps that appear.
You can delete multiple entries at once by checking them from the left side of the table and then clicking the button Supprimer.
Reset DNS zone
Resetting your DNS zone allows you to:
- or return to a minimal configuration with the default OVHcloud entries.
- or revert to an empty DNS zone (except for NS fields), to set further manual configuration.
From the tab Zone DNS, click on Réinitialiser ma zone DNS then follow the steps that appear.
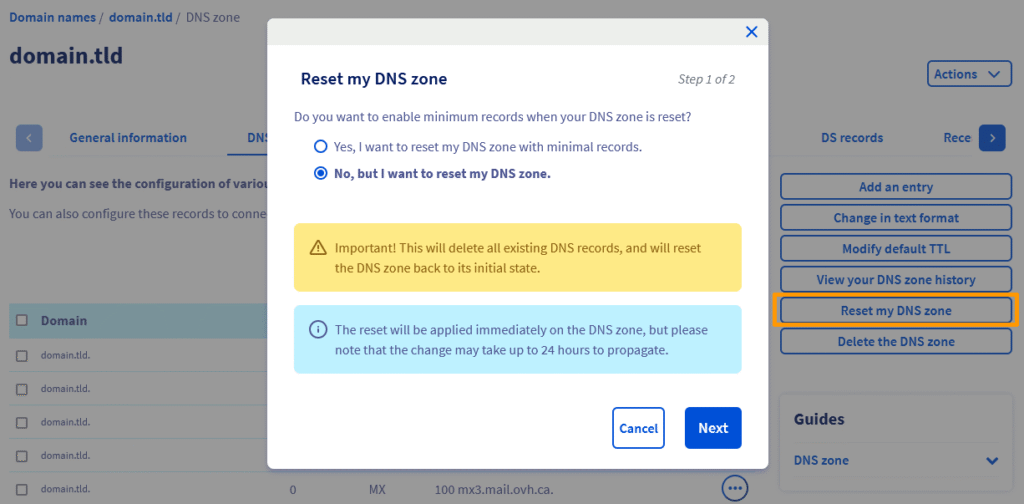
You have the choice between:
Oui, je veux réinitialiser ma zone DNS avec les entrées minimalesThis option allows you to direct your domain name and email service to:- one of your Web Cloud services available in your OVHcloud customer area.
- the OVHcloud redirection service, accessible via
Redirectionyour domain name tab in theNoms de domaineand sectionsEmails. - the function
Personnalisé. Enter the fieldAand/orMXof your choice.
Non, mais je veux réinitialiser ma zone DNSYour DNS zone will then be empty, except for the NS entries which will be automatically attached to the OVHcloud DNS servers in your DNS zone.
Before resetting your DNS zone, make sure your domain name is not attached to any services in use, such as a website or email addresses.
The propagation time
Once the DNS zone of your domain name has been modified, a propagation time of up to 24 hours is required for the changes to take effect.
If you want to reduce this delay for future editions of your OVHcloud DNS zone, you can modify it, to a certain extent, by adjusting the TTL ( Time To Live ) which will apply to all records in the DNS zone. To do this, go to the tab Zone DNS in your customer area, click on the button TTL par défaut and then follow the steps that appear.
You can also change the TTL of a DNS record. However, we can only do this on one record at a time, whether you’re editing or adding it.
Special use case: the use of CNAME records
Some users create DNS zones directly for a domain’s subdomain (e.g., subdomain-with-its-own-DNS-zone.mydomain.ovh ). The rule specified earlier in this guide also applies in this case.
The DNS zone being created for the subdomain (in our example subdomain-having-its-own-DNS-zone.mydomain.ovh ), the latter is then considered as a domain in its own right in its DNS zone.
Therefore, in this specific case, you will not be able to create a CNAME field for subdomain-with-its-own-DNS-zone.mydomain.ovh in the DNS zone you created for it. However, you can create CNAME fields such as subdomain.subdomain-with-its-own-DNS-zone.mydomain.ovh or xxx.subdomain-with-its-own-DNS-zone.mydomain.ovh .