How to prevent your emails from ending up in spam?
Email is still as important as ever, despite the clickbait headlines and claims from many communications startups. Email is so popular that even spam accounts for 14.5 billion messages per day in 2021. That’s 45% of all emails. As a result, companies like Microsoft have become experts at filtering the email wheat from the chaff. Ultimately, we almost never notice the barrage of spam launched against our email servers. However, occasionally, a legitimate email ends up in a spam folder. This is bad news if you’re planning to transmit something important to a client or supplier.
Make sure the receiving domains know your traffic is good
Email servers, such as Office 365, rely on a series of open standards and technologies. This helps separate good emails from spam, such as SPF and DKIM. This means that all of your company’s email sending systems must be properly configured to use these standards. This ensures that your outgoing emails don’t end up in the recipient’s quarantine or spam folder.
Most email administrators know that a large portion of their outgoing emails originate from Outlook. They are routed through Office 365 or their on-premises Exchange mail server. However, these same administrators are unaware of other systems that send emails to their company’s domain name.
This article will guide you through setting up two effective technologies to ensure your outgoing emails are received successfully. These technologies are known as Sender Policy Framework (SPF) and DomainKeys Identified Mail (DKIM).
SPF and DKIM
SPK/DKIM technologies require you to add records to the DNS zones of domain names. The recipient’s email server analyzes the headers of each email message. It then looks at these DNS records to try to match the sending server’s details to the configuration. If the sending server passes these tests, the message will not be marked as spam or suspicious.
Control your outgoing emails
Before configuring these elements, you should make a list of all the domain names of your outgoing messages. Obviously, this will include your usual email service, such as Office 365 or Exchange. But it’s important to capture other third parties that may send emails from your domain, such as:
- CRM systems
- Marketing Automation Systems
- Helpdesk ticketing systems
- Notification and alert services
You’ll need to configure SPF and DKIM for all of these services, which is why most major providers have excellent support and documentation for setting up SPF and DKIM.
Implementing SPF for Office 365
With a documented list of all your email sending locations, you can configure SPF for Office 365. To begin, log in to your DNS provider. Then, create a TXT record for the root of the domain you’re sending emails from. You’ll need to consult your DNS provider’s documentation. This will provide instructions on how to create a TXT record.
Implementation
In the Value box, you will need to add the actual SPF record. For most Office 365 customers, the record will look like this:
v=spf1 include:spf.protection.outlook.com -allIt can be broken down into three elements:
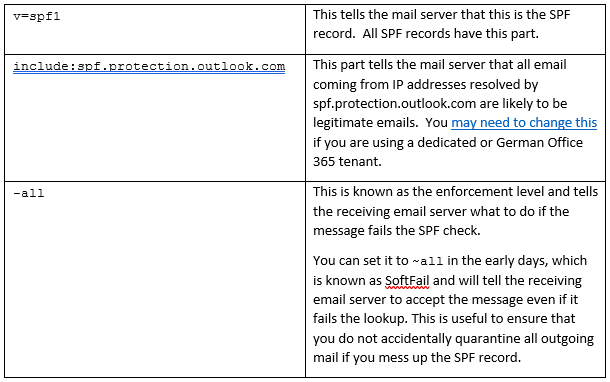
You’ll need to add an include: part for each other email service that sends emails from this domain name. The example below allows emails to come from:
- of Office 365,
- from Amazon Web Services
- from a mail server with the IP address 203.12.45.55.
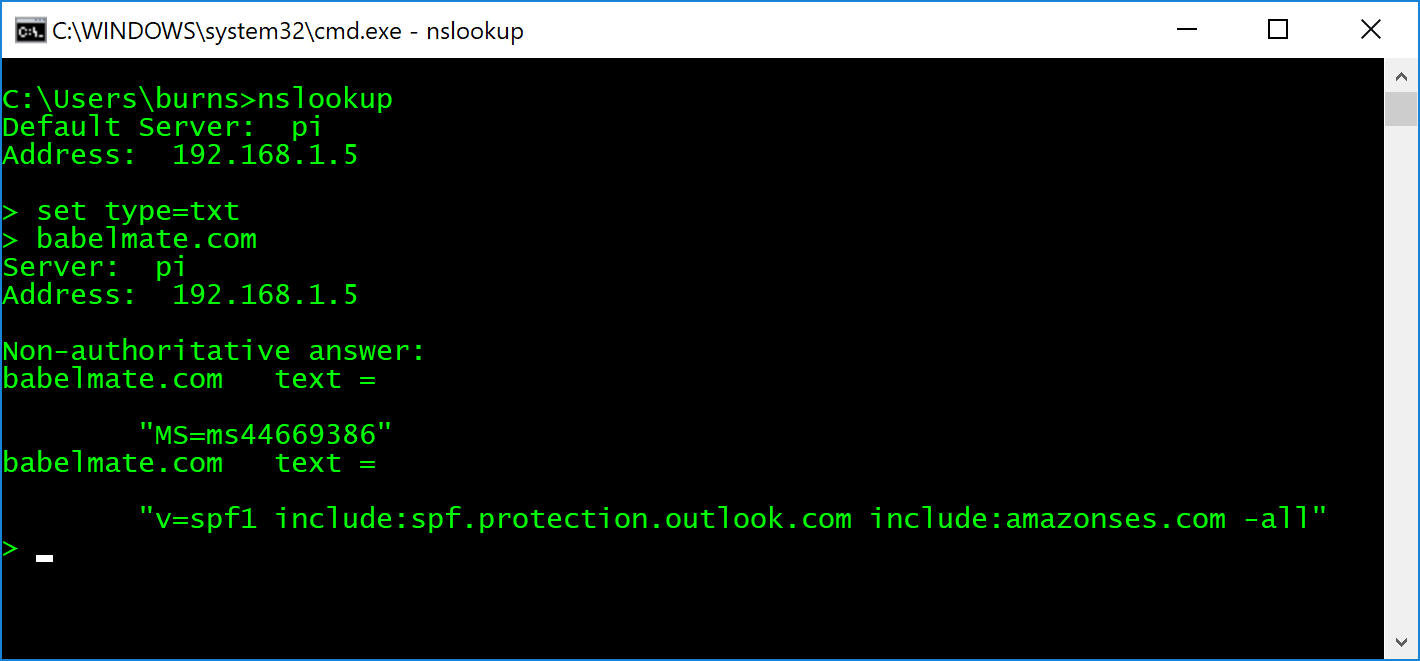
v=spf1 include:spf.protection.outlook.com include:amazonses.com ip4:203.12.45.55 -allYou can find more information about all the options available in the SPF record on the
OpenSPF website . Then you can validate the record using nslookup in a Windows Command Prompt or PowerShell window. Simply open nslookup, set the search type to TXT using the command set type=txt. Then search for the domain name as in the example below.
Verification
Check the syntax accuracy of your DNS record by pasting it into an SPF syntax checking service. However, you should be aware that the SPF record has limits on the number of servers or DNS lookups added. And there are a few other issues you should avoid.
Once your SPF record is validated, you can replace the SoftFail ~all with a more robust HardFail of -all.
Implementing DKIM for Office 365
SPF is an excellent technology for identifying email server IP addresses. However, it has several limitations. I recommend also implementing another technology called DKIM. DKIM goes a step further in email authentication by signing an email message with a digital signature.
When DKIM is configured for Office 365, a digital signature is placed in the header of each outgoing email. When an email is received by the receiving mail server, it looks up the DKIM public key in the DNS record. Then, it uses this to verify the DKIM signature it found. If the signature is verified, the server knows that the message was sent by an authorized mail server. In this case, the server authorizes the message.
Implementation
To enable DKIM in Office 365, you need to create two DNS CNAME records in your domain’s hosted zone. To do this, you’ll need to follow your DNS provider’s instructions.
The two records you need to create will look like this:
Host name:                selector1._domainkey.<domain>
Points to address or value:      selector1-<domainGUID>._domainkey.<initialDomain>
TTL:                             3600

Host name:                selector2._domainkey.<domain>
Points to address or value:      selector2-<domainGUID>._domainkey.<initialDomain>
TTL:                             3600
The two parts you need to complete are:
<domainGUID> | The domain GUID is the same as the one that is in your MX record, usually the first part of it. For example: babelmate-com.mail.protection.outlook.com |
<initialDomain> | The Initial Domain is the domain you used to sign up to Office 365, and ends in .onmicrosoft.com. For example: babelmate.onmicrosoft.com |
Again, you can verify that you have defined the records correctly using nslookup:
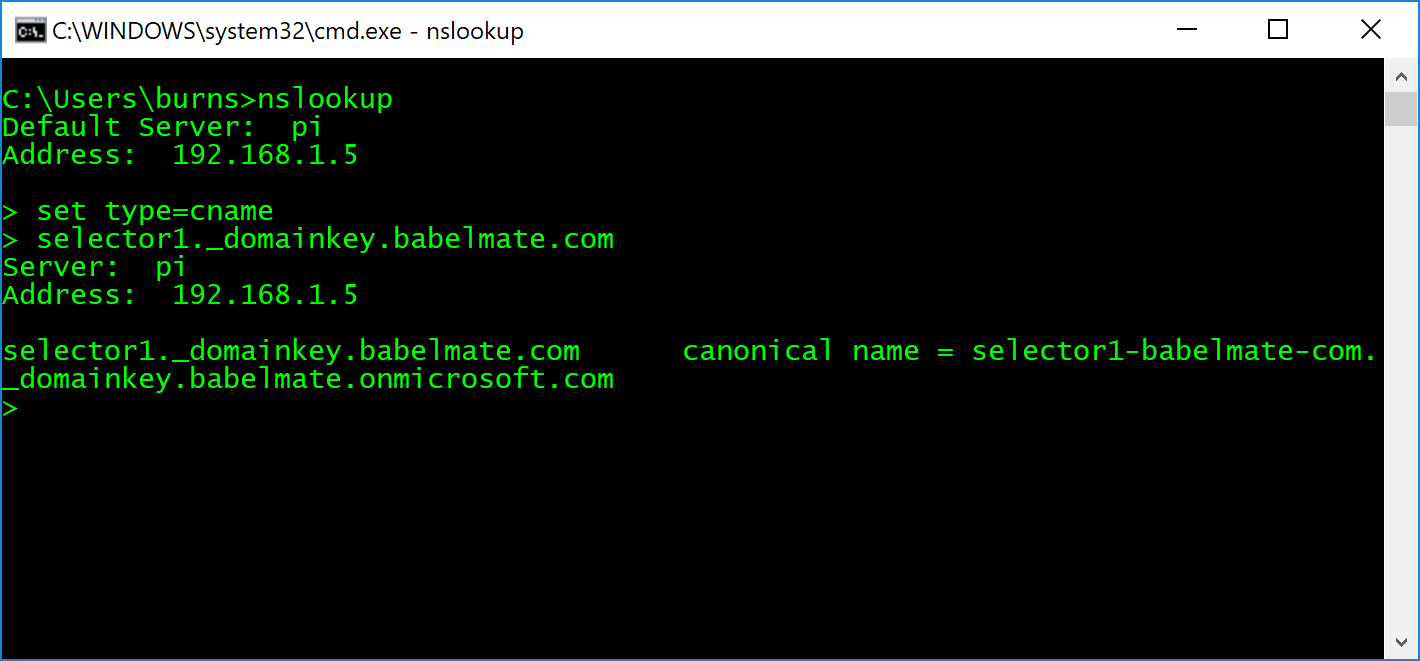
Now that the records are published, you need to enable DKIM for the domain via PowerShell. First, connect to Exchange via Online PowerShell and run the following command:
New-DkimSigningConfig -DomainName <domain> -Enabled $trueDomain is the name of the custom domain for which you want to enable DKIM signing. For example, for the domain babelmate.com:
New-DkimSigningConfig -DomainName babelmate.com -Enabled $trueVerification
You can validate the configuration by logging into the Exchange console and clicking on the Protection section.
How to prevent your emails from ending up in spam?
Once you’ve set up DKIM for Office 365, I highly recommend extending it to your other third-party email services. Each will have its own, but similar, way of setting up DKIM. For example, here’s how you can do it for SalesForce and HubSpot.
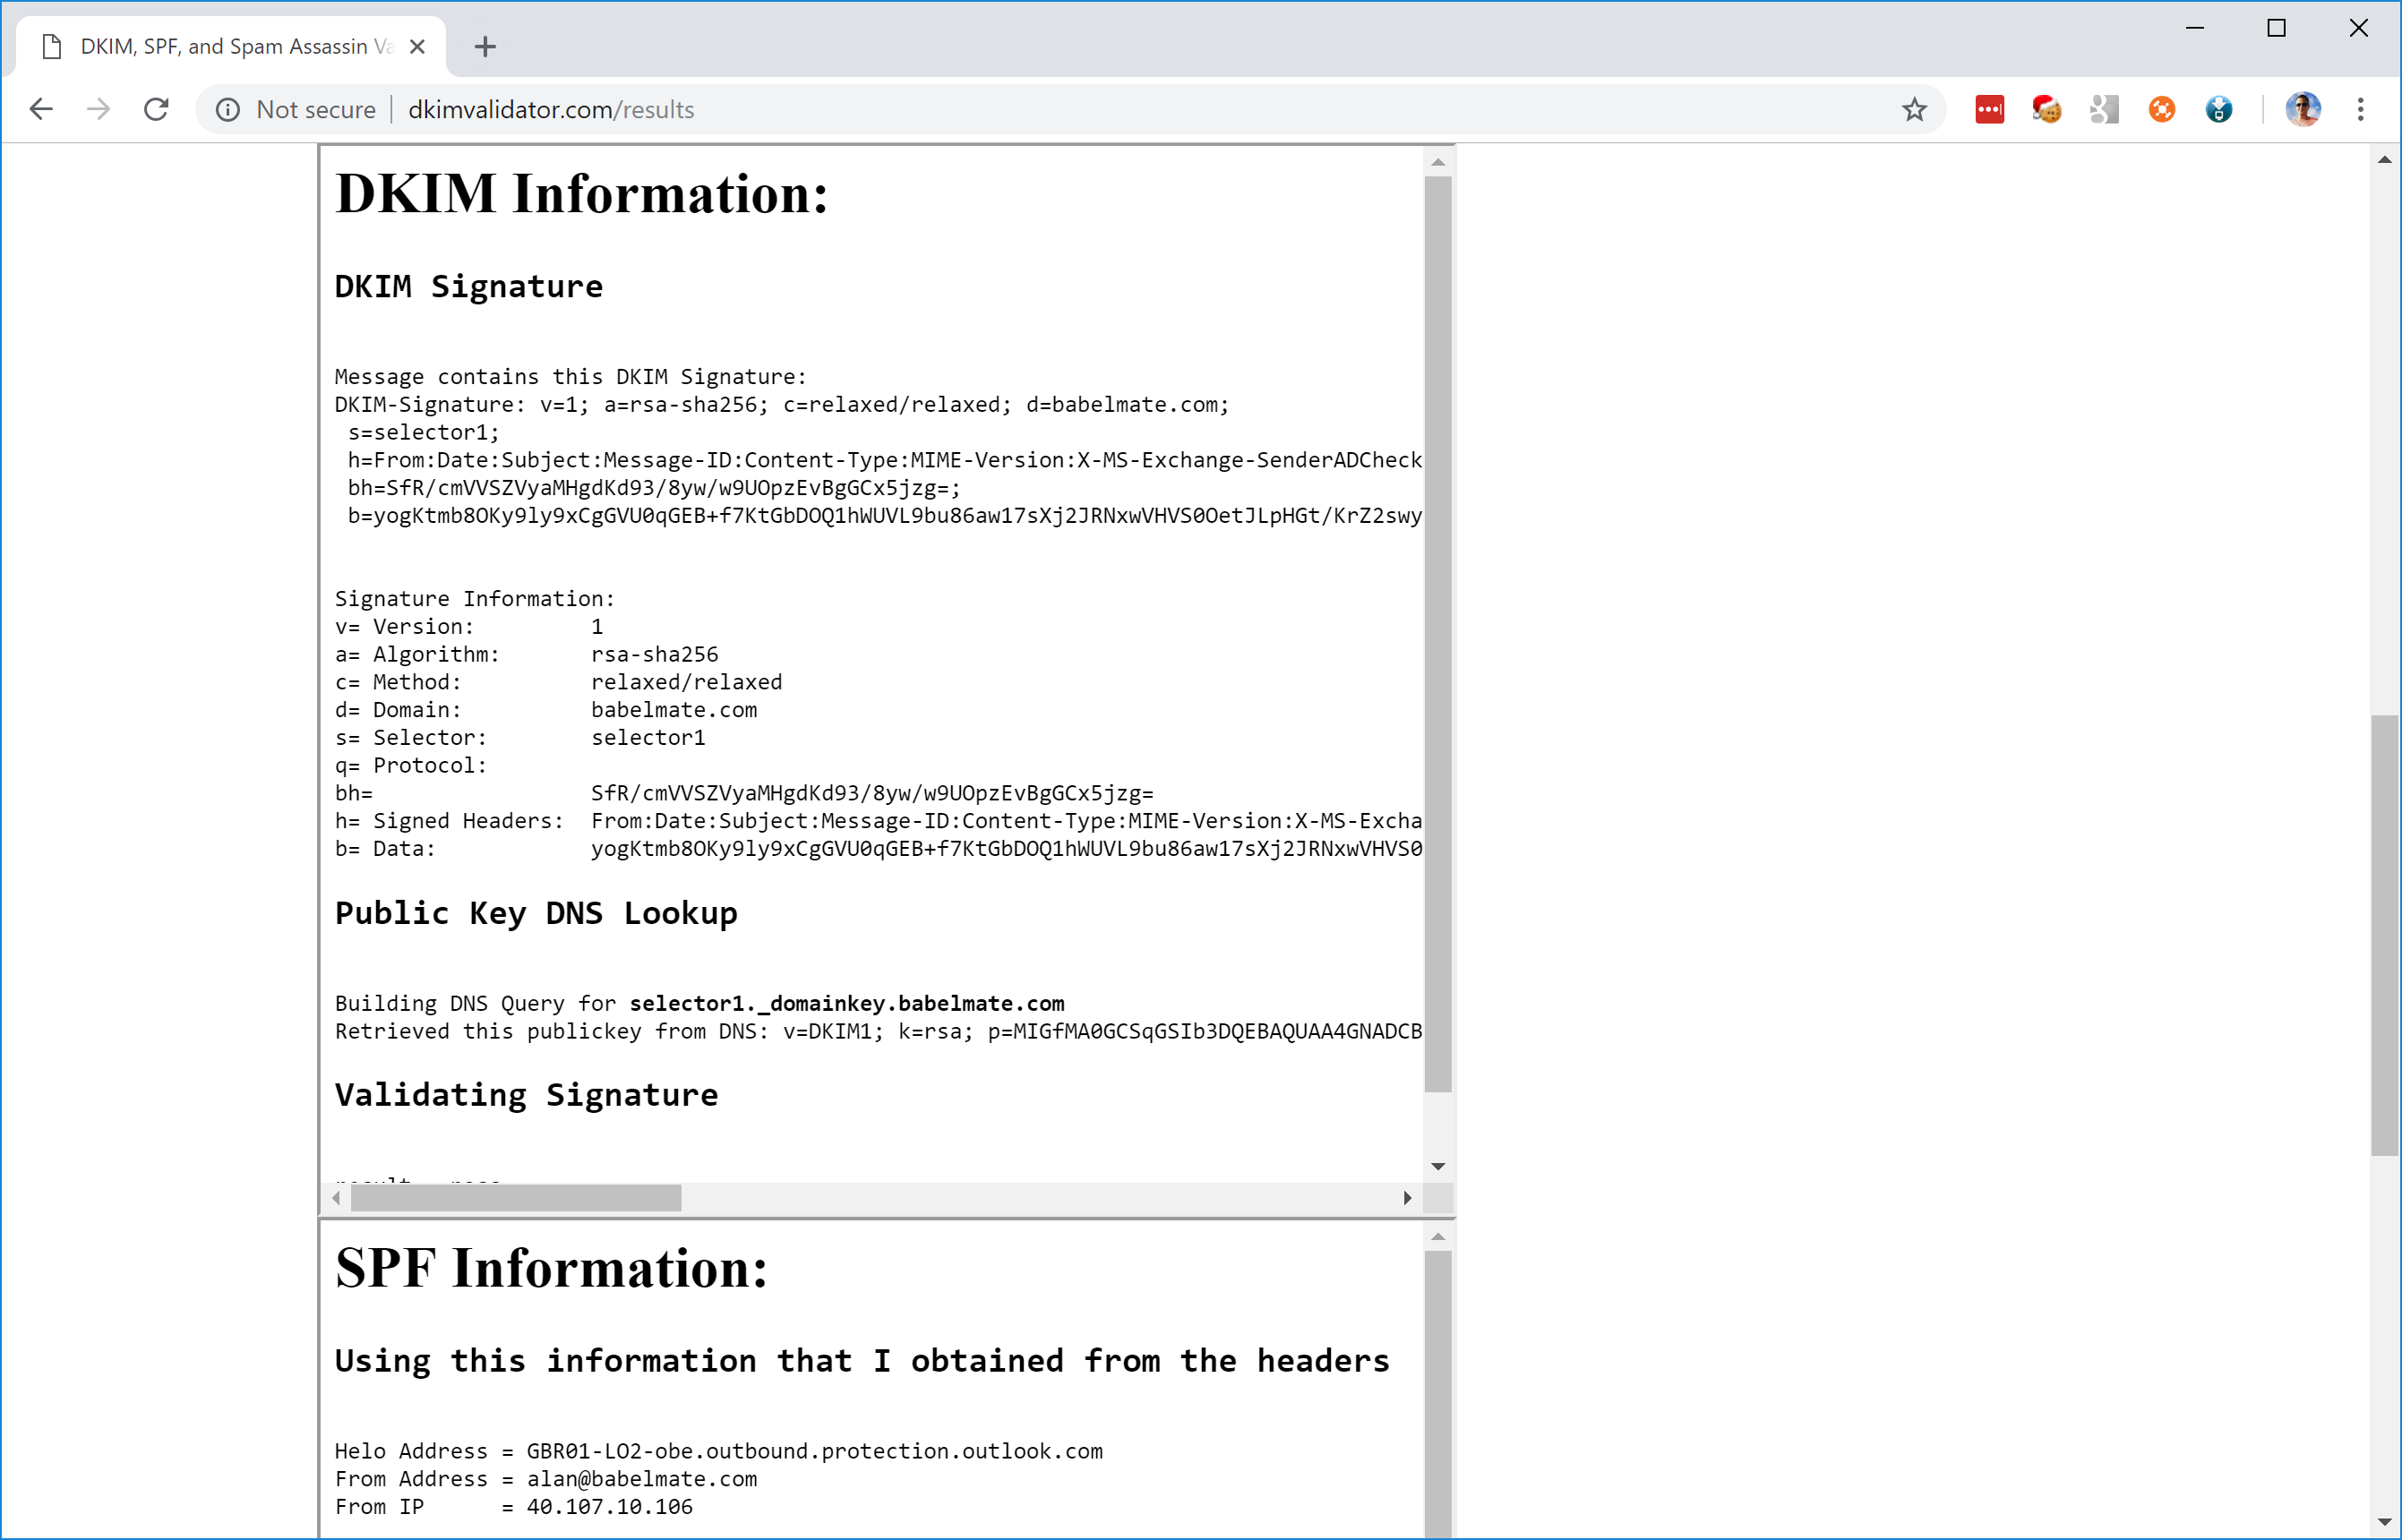
You can also send an email from Outlook to an external email address and look at the message headers. For example, here you can see the SPF and DKIM headers in an email I sent to my Gmail address:
Received-SPF: pass (google.com: domain of alan@babelmate.com designates 40.107.11.100 as permitted sender) client-ip=40.107.11.100;</pre>
Authentication-Results: mx.google.com;

dkim=pass header.i=@babelmate.com header.s=selector1 header.b="cst/05/j";
spf=pass (google.com: domain of alan@babelmate.com designates 40.107.11.100 as permitted sender) smtp.mailfrom=alan@babelmate.com;
dmarc=pass (p=NONE sp=NONE dis=NONE) header.from=babelmate.com

DKIM-Signature: v=1; a=rsa-sha256; c=relaxed/relaxed; d=babelmate.com; s=selector1; h=From:Date:Subject:Message-ID:Content-Type:MIME-Version:X-MS-Exchange-SenderADCheck; bh=CK4iL1LPMW2lTFfTZoFjiwQEukVWMQZUQTCNd8K2yoo=; b=cst/05/jsF1rD+usfceT8Q6U2uudA8KFhcnYzkLl5Lz0UBeOK9v8jjZw11xserBvr/5rVwmVBvzi7Xqg4rWxsR+0q2WhrzMad+J0uT7xa/VFLuzIeUh/1g959QllKfxW3a8pCLvmTdYu30iVRSE2f1YEy7z7bBOPZxlc2cgqnxk=
If all your checks are passed, you’re done! From now on, your messages are very unlikely to be considered spam, and messages from anyone spoofing your domain from unauthorized servers will be flagged and blocked.
Microsoft Defender: Getting the Most Out of Office 365 Policies