How to share audio files during a Teams meeting
Why can’t participants hear audio when sharing video in a Teams meeting?
When you’re hosting a Teams meeting and sharing a video, you may encounter a sound issue. Participants can’t hear the audio from your video. If you want to broadcast a video, you don’t automatically broadcast the audio to meeting participants.
This isn’t an active setting by default, so you’ll need to make sure you include your computer’s audio in the screen sharing process.
Sharing an audio file in a Microsoft Teams meeting is more than just sending the file in the chat. If your goal is for participants to hear the sound live (for example, from an MP3 or WAV file), you’ll need to share your screen and include your computer’s audio. Here’s how to do it step-by-step:
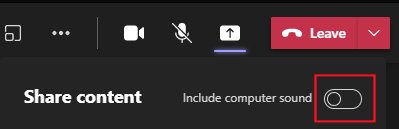
See how to include computer sound when screen sharing:
- Open Microsoft Teams (I’m using the desktop app)
- Start a meeting as you normally would
- Once the meeting has started, click the Screen Contents button.

- The “Share Content” panel opens
- Enable the Include computer sound button
- Now choose an individual screen or program window to share with other meeting participants.
- If you view and play a video like this one from YouTube, you will share the audio with meeting participants.
There you have it, a short and simple process that allows participants to hear the audio you are playing during a screen share.
Additional Tips
- If you forget to enable “Include computer sound,” simply stop sharing and start again with the setting activated.
- Don’t speak while the audio is playing if you want the best sound quality for listeners.
- Alternatively, you can upload the audio file to the meeting chat, but in that case, everyone will have to play it individually.